Strawberry Tuxedo Cake Recipe (video)

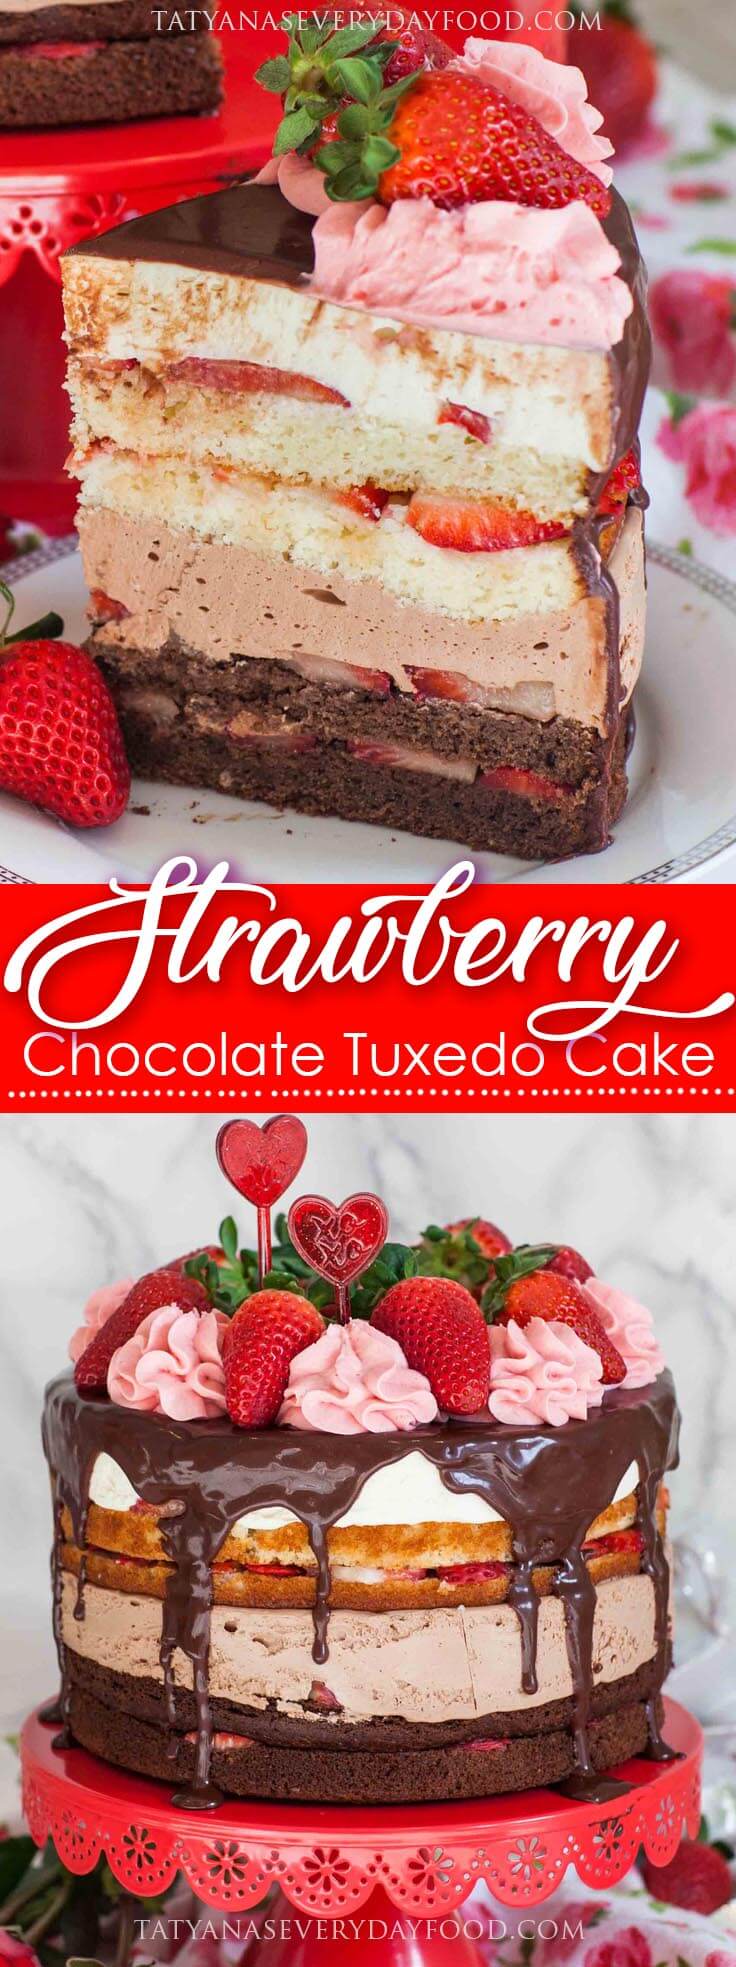
This stunning strawberry tuxedo cake is a fun and fruity take on my original tuxedo cake and I think you’ll love it! It’s made with tender chocolate and vanilla cake layers, no-bake chocolate cheesecake layers and loads of strawberries. And let’s not forget about the chocolate ganache and caramel sauce! It’s a chocolate strawberry cheesecake cake – what more can you ask for?! I used my ‘Chocolate Ganache Recipe’, my ‘Berry Whipped Cream Frosting’ and my ‘Chocolate Cake Recipe’ to put this towering cake together!
My Strawberry Tuxedo Cake Video Tutorial
Watch my YouTube video tutorial for step-by-step instructions and all the details for making this stunning strawberry tuxedo cake! Want to receive new recipe updates? Make sure to subscribe to my website emailing list and my YouTube channel and turn on notifications!
Ingredients for Strawberry Tuxedo Cake
This stunning strawberry cake with no-bake cheesecake layers is so delicious! Here are the main ingredients you’ll need to assemble the cake:
- Butter, Vanilla, Eggs & Whole Milk: the wet ingredients for making the cake layers. Soften the butter at room temperature and have the eggs at room temperature also.
- Sugar, Flour, Baking Powder, & Salt: the dry ingredients for making the cake layers.
- Cocoa Powder & Semi-Sweet Chocolate: for making the chocolate cake layers. Using a combination of these two makes the cake extra rich and chocolate-y!
- Cream Cheese: for making the no-bake cheesecake filling. Soften the cheese at room temperature for 30 to 45 minutes so it’s easier to cream.
- Sweetened Condensed Milk: for the cheesecake filling. This ingredient takes place of eggs and sugar in a regular cheesecake recipe. You’ll notice I don’t add additional sugar into the filling recipe!
- White & Semi-Sweet Chocolate Chips: for making the two types of chocolate cheesecake fillings! You’ll also need some for making the chocolate ganache!
- Gelatin: you’ll need unflavored gelatin to set the filling. The fillings will not set without gelatin! You can use the same amount of agar gelatin if you’re looking for a gelatin option.
- Strawberries: I recommend using fresh strawberries for filling and garnishing the cake.
- Caramel Sauce: use a store-bought caramel sauce, or make a batch of my ‘Homemade Caramel Sauce’ instead. You’ll use the caramel for soaking the vanilla cake!
- Chocolate Sauce: use a store-bought chocolate sauce, or melted chocolate, for soaking the chocolate cake layers.
- Heavy Cream: for making the optional whipped cream topping, for garnishing the cake.

Making the Cake Layers
This tuxedo cake recipe is made with two types of cake layers – chocolate and vanilla! I used both my ‘Basic Chocolate Cake’ and ‘Basic Vanilla Cake’ recipes. These easy recipes are great for any cake creation that needs a chocolate cake or vanilla cake base. I used half a recipe of each, or you can follow the simplified recipe I have down below in the instructions.
- Prepare the cake layers according to the instructions and allow them to cool completely before you assemble this strawberry cake!
- The cake layers can be made ahead of time, too! Just let the layers cool completely, then wrap them well in plastic wrap and place them into the refrigerator for up to 2 days, or into the freezer for up to a week.
Making the No-Bake Cheesecake Filling
Once you have the cake layers done and ready to, it’s time to prepare the no-bake chocolate cheesecake filling that’s going to go in between the layers! It’s super easy to make, too!
- In a large mixing bowl, beat the cream cheese, vanilla and sour cream for 3 to 4 minutes, until the mixture is smooth. Scrape down the sides of the mixing bowl to ensure no clumps of cheese remain. Add the sweetened condensed milk and mix again for a minute.
- In a small ramekin, prepare the gelatin mixture. Combine the unflavored gelatin and water, stirring until the gelatin is absorbed. Microwave the mixture for 30 seconds, stirring every 10 seconds, until the gelatin is dissolved. Pour the hot gelatin directly into the filling and mix it in right away. Divide the batter into two separate mixing bowls to create two different cheesecake flavors!
- Into one mixing bowl, add the melted dark chocolate; into the second bowl, add the melted white chocolate. Use a mixer or whisk to mix the chocolate into the batter.

How to Make a Strawberry Tuxedo Cake
Assembling this chocolate and cheesecake cake is a breeze once you have all the different components together! Assemble the cake in an 8-inch springform pan (or corresponding size pan). Line the sides of the pan first with an acetate cake collar, which will help keep everything together.
- If you wish to make some of your own caramel sauce, I recommend giving my ‘Homemade Caramel Sauce’ recipe a try! It’s so delicious and takes just 5 to 7 minutes to make!
- Slice some fresh strawberries for adding into the cake.
- Split the chocolate and vanilla cake layers in half, creating 4 cake layers total.
- Begin with one-half of the chocolate cake layer first. Drop into the prepared springform pan. Soak the first half generously with chocolate sauce (or melted chocolate) and add a layer of sliced strawberries. Top with the second half and repeat the process.
- Next, pour in the chocolate cheesecake filling. Spread the filling evenly to the edges, then top with the first vanilla cake layer.
- Soak the vanilla cake layer with caramel sauce, then add a layer of strawberries and repeat with the second half of the vanilla cake layer.
- Add the white chocolate cheesecake filling on top last and use an offset spatula to level the top.
- Place the cake into the refrigerator and allow it to set for at least 6 hours, or best overnight.

Garnishing the Strawberry Cake
Once the strawberry tuxedo cake has been assembled, set and ready to be enjoyed, you can garnish the top of it to make it look extra festive!
- First, transfer the cake with the acetate cake collar wrapped around it onto a cake stand. Remove the plastic only once the cake is transferred.
- Make a batch of my ‘Chocolate Ganache’ and pour the chocolate over the top and sides, letting it drip down.
- Add dollops of my ‘Berry Whipped Cream Frosting’ on the top. If you have kept the frosting in the refrigerator overnight, it may need to be re-whisked so it’s light and fluffy again. You can also use plain whipped cream in place of the frosting.
- Add fresh strawberries on top, too, along with any other decorations or garnishes you wish to add. I made this cake for Valentine’s Day so I added plastic hearts, too.
Tips for Making a Tall Cake
Special note: To achieve this tall and stunning cake, I used an 8-inch spring form pan and an acetate cake collar (affiliate link) to add height to my pan. This product usually comes in a bulk roll that you can cut down to size for each cake. If needed, double the roll by taping it together to achieve a taller cake. This recipe can also be make in 9 or 10-inch pans; the cake will be shorter but will still taste great!
Save it to Pinterest!
More Recipes!
Enjoyed this strawberry tuxedo cake recipe? Make sure to check out some of my other recipes you’re sure to enjoy!
- Ultimate Strawberry Cheesecake – stunning berry cheesecake with diced strawberries and strawberry jam, topped with chocolate strawberries!
- And, this no-bake ‘Strawberry Tiramisu Cake’ is amazing for summer, made with lady fingers, strawberry puree and tiramisu filling!
- My ‘Strawberry Mousse Cake’ is bound to steal the show every time, with sponge cake, berry mousse and strawberry jello!
- This Eastern European ‘Strawberry Zefir Torte’ is made with strawberry marshmallow filling, sponge cake and strawberry buttercream!
- No-Bake Strawberry Cheesecake Tart – stunning tart with a pretzel-graham cracker crust and the best strawberry cheesecake filling!
Supplies & Tools
Need some supplies or tools to make this cake recipe? You can get them here (Amazon affiliate links):
- I buy my acetate cake collar in a bulk roll, then cut it down to size for each cake.
- Use a spring form pan for best results – easy to move the cake from pan to stand.
- I love my handy handheld KitchenAid mixer – gets the job done.
- And here are the same heart-shaped stirrers I used for topping the cake.

Strawberry Tuxedo Cake Recipe (video)
Ingredients
- 1 cup unsalted butter, softened
- 1 cup white granulated sugar
- 1 teaspoon vanilla extract
- 4 large eggs
- 1 cup milk, lukewarm
- 2 cups all-purpose flour
- 4 tsp baking powder
- 1/4 tsp salt
- 2 tablespoons cocoa powder
- 1/2 cup dark chocolate chips, melted
For Cheesecake Filling:
- 24 oz cream cheese, softened
- 2 teaspoons vanilla extract
- 1/2 cup sour cream
- 3/4 cup sweetened condensed milk
- 1 1/2 tablespoons unflavored gelatin
- 3 tablespoons water
- 1/2 cup dark chocolate chips, melted
- 1/2 cup white chocolate chips, melted
For Filling:
- 1/2 cup caramel sauce
- 1/2 cup chocolate sauce, or melted chocolate
- 4 cups fresh strawberries, sliced
- 8 large strawberries, for garnish
For Chocolate Ganache:
- 1 cup semi-sweet chocolate chips
- 1/3 cup heavy cream
For Whipped Cream:
- 1 cup heavy cream, well-chilled
- 1/3 cup confectioner's sugar
- 1/2 tsp vanilla extract, or strawberry extract
Instructions
Preparing the Cake Layers:
- Prepare the cake layers first. Preheat the oven to 350F/177C and line the bottom of 2, 8-inch (20-cm) pans with parchment paper. In a large mixing bowl, cream together the softened butter, sugar and vanilla for a few minutes, until smooth and creamy. Add the eggs, one at a time, mixing well after each addition. Pour in the milk but do not mix.
- In a separate bowl, combine the dry ingredients: flour, baking powder and salt. Sift the dry ingredients into the batter and mix by hand, just until the dry ingredient are incorporated. Separate the batter in half. Into the second half, add the cocoa powder and melted chocolate, then mix until well combined. Pour the batters into the prepared pans. Bake in preheated oven for 30 to 35 minutes, until a toothpick inserted into the center comes out clean. Allow the layers to cool completely, then level the tops if needed and cut in half with a long, serrated knife.
Making the Cheesecake Filling:
- Once the layers are cooled, prepare the cheesecake filling. In a large mixing bowl, beat the cream cheese, vanilla and sour cream for 3 to 4 minutes, until the mixture is smooth. Scrape down the sides of the mixing bowl to ensure no clumps of cheese remain. Add the sweetened condensed milk and mix again for a minute.
- In a small ramekin, prepare the gelatin mixture. Combine the unflavored gelatin and water, stirring until the gelatin is absorbed. Microwave the mixture for 30 seconds, stirring every 10 seconds, until the gelatin is dissolved. Pour the hot gelatin directly into the filling and mix it in right away. Divide the batter into two separate mixing bowls.
- Into one mixing bowl, add the melted dark chocolate; into the second bowl, add the melted white chocolate. Use a mixer or whisk to mix the chocolate into the batter.
Assembling the Cake:
- Assemble the cake in an 8-inch springform pan (or corresponding size pan). Begin with the chocolate cake layer. Soak the first half generously with chocolate sauce (or melted chocolate) and add a layer of sliced strawberries. Top with the second half and repeat the process. If using an acetate cake collar, insert it into the pan, then pour in the chocolate cheesecake filling. Spread the filling evenly to the edges, then top with the first vanilla cake layer.
- Soak the vanilla cake layer with caramel sauce, then add a layer of strawberries and repeat. Add the white chocolate cheesecake filling on top last and use an offset spatula to level the top. Place the cake into the refrigerator and allow it to set for at least 6 hours, or best overnight.
Garnishing the Cake:
- Once cake is set, use a cake spatula to gently transfer the cake onto a stand. Keep the cake wrapped with the acetate cake collar and remove the plastic once the cake has been transferred.
- For the Chocolate Glaze: heat the heavy cream on the stove top or in a microwave-safe glass bowl/cup until it's hot. Add the chocolate chips and allow the chips to sit for a few minutes, melting. Then, using a spoon, stir the chocolate and cream together until smooth. If glaze is too thick, add HOT heavy cream. Allow the glaze to cool for a few minutes if it’s too hot, then pour over your cake, pouring from the center and spreading to the edges with a spatula. Alternatively, transfer the glaze into a pastry bag and drizzle down sides first, then fill center.
- Allow the chocolate to set for about 15 minutes, then add the 'Berry Whipped Cream Frosting'. You can also use regular whipped cream for this recipe. To make regular whipped cream, simply whisk together the chilled cream, sugar and vanilla on high speed for 4 to 5 minutes, until stiff peaks form. Garnish with additional strawberries, if desired.
- Keep cake refrigerated until ready to serve; it can be left at room temperature for up to 2 hours.


Tatyana, what is the tool showed in the video to make sure the layers stay upright?
I used an acetate cake collar, it comes in a large roll that you can cut for any size cake. I have it in my amazon shop 🙂
hi tatiana, i have a question what can i use to make the layers more moist my husband doesnt like dry cake layers what can i soak them with and use the chocolate and Carmel sause aswell ?
Hi! the cake layers are fairly moist but if you want, you can soak the layers with simple syrup (1 cup boiling water + 1/2 cup sugar), or you can dilute a chocolate liqueur with a bit of water and add that, too 🙂
Ok, thanks I’ll try that. The cake looks so beautiful and yummy can’t wait to try it, thankyou for another beautiful cake recipe
Would you have any ideas on why my cakes cracked? Like really cracked. I couldn’t even cut them in half. What did i do wrong?
Oh, no! So sorry to hear that! Did you let them cool down all the way before handling them? They can be fragile while they’re still warm. Also could be not enough flour…
Can’t wait to try this! Such an interesting recipe
Can’t wait to try this! Such an interesting recipe
It’s very good! Enjoy! 🙂
Beautiful cake!!! How do you get such perfect pictures, what camera do you use or what do you do so you don’t have any shadows.
Thank you! 🙂 I use a Canon Mark II, with an 85mm lens
Hi. Is it possible to serve the cake earlier, like after 5 hours of leaving it in the fridge? I was making this cake for guests later tonight, and I didn’t notice it said it’s shpposed to stay in the fridge overnight, until I furnished baking the cake. Thankyou for your wonderful cake recipes, I tried most of them, and they are all delicious!!!
That might be just fine! The cheesecake layers just need to set up. Hope everyone enjoys the cake! 🙂
I would definitely try this weekend and then will gift this birthday cake to my brother. He would be more than happy. He always likes homemade cake, not those fancy cakes which have lots of fondants.
I’m sure he’s going to love this cake! It’s one of my favorites! 🙂
Made this cake exactly as written; it came out beautiful. Guests enjoyed it. However, I wasn’t overly impressed with the flavors. I prefer taste to appearance. It was fun to make though
I’m so glad it was a hit with the guests! 🙂 I love the creative process, too! I’m sorry you didn’t enjoy the cake…
Cake looks really good. Have to try it
Thank you! 🙂 Enjoy! I love the no-bake cheesecake combined with the cake layers!
This was one of the first cakes I tried to make for Valentine’s Day and it was such a hit! The flavors were wonderful and not overly sweet and looked so gorgeous! Thank you for this wonderful recipe Tatyana!
Awesome! 🙂 I’m so glad you enjoyed the recipe! One of my favorites with all the flavors!
hi Tatyana
chance upon your fb and you look so beautiful like your cake. 😍
the ingredients Combination look all so sweet to me. Could I reduce the sweetness level somewhere? Omit condense milk?
thank
Hi Jamie! I’m so glad you found me on Facebook! Yes, you can absolutely reduce the sugar amounts. You will need the condensed milk so I wouldn’t omit it all together, about reduce to 1/3 cup. Enjoy!
Hi Tatyana! My daughter asked me to make her this cake for her 12th birthday. I was wondering how long could I store it in the refrigerator after I ganache it? Will is stay stable without the acetate? Thank you!!
Hi Cynthia! This a great cake for a birthday! I recommend letting the cheesecake layers set overnight, then remove the acetate paper and add the ganache. Once the layers have set firmly, they won’t be going anywhere and the cake should be very stable. It can keep well for 3 to 4 days. Enjoy!
Planing to recreate this for my mom’s birthday! Do you think I can use powdered sugar for the cake batter?
New to baking cakes, haha Idk if that is a silly question!
Hi! I’m sure your mom will love the cake! I recommend sticking with regular sugar for the cake batter for best results. Have fun baking! 🙂
Amazing cake! I made it last year for my bday and it looked amd tasted great!
I’m so glad you enjoyed it for your birthday! It’s such a special cake! 🙂
Absolutely loved this cake!!! So flavorful plus chocolate and strawberries make a perfect combination. Also, somewhat easy to make. Approved by husband and family 🙂
Wonderful! I’m so glad the whole family enjoys it! 🙂 Thanks for the review!