No-Bake Vanilla Cheesecake with Raspberry Swirls (video)

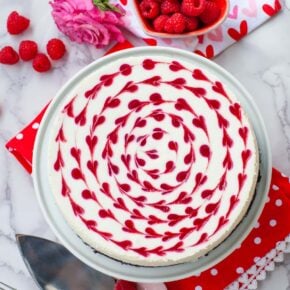
This stunning raspberry swirl cheesecake garnished with raspberry hearts is so easy to make! You’ll love this no-bake vanilla cheese cake with a chocolate cookie crust! The cheesecake itself is super rich, creamy, incredibly delicious! The raspberry hearts or swirls on the top are made with a simple raspberry sauce. This no-bake cheesecake is perfect for special occasions, such as Valentine’s Day and Mother’s Day!
Watch My Cheesecake Video Tutorial
Watch my YouTube no-bake cheesecake tutorial for step-by-step instructions and see how I add the raspberry hearts to the top. It’s super easy to do! Want to stay up to date on the latest recipes? Make sure to subscribe to my website email list and my YouTube channel and turn on notifications.
Ingredients for No-Bake Cheesecake Recipe
Here are my tips for the main ingredients you’ll need to make this delicious raspberry swirl cheesecake. Find the full list of ingredients with measurements in the printable recipe card below.
- Cream Cheese: I usually soften my cheese at room temperature for about 1 hour so it’s nice and soft. This way, it’s easier to blend and cream.
- Oreo Cookies: any type of chocolate sandwich cookie will work. You can also use chocolate graham crackers for the crust.
- Sweetened Condensed Milk: in place of the eggs and sugar you would use in a regular, baked cheesecake. This will add all the sweetness we need.
- Unflavored Gelatin: for setting the cheesecake. This recipe will not work without some kind of gelatin, be it regular gelatin or a plant-based option such as agar gelatin.
- Raspberries: either fresh or frozen berries will work well.
Supplies & Tools for the Recipe
Need some supplies or tools to make this delicious cheesecake at home? Shop my Amazon Affiliate links for some of the items I use in my kitchen. Using these links won’t cost you extra and you’ll be supporting my business.
- 9-inch Spring Form Pan: I love this brand!
- CuisinArt Food Processor: simple, powerful, and great for a variety of items.
- Sauce Dispenser Bottle: for making the raspberry hearts on top.
- KitchenAid Stand Mixer: a must for every serious baker!
- Agar Gelatin: for a plant-based alternative to regular gelatin.

Preparing the Chocolate Cookie Crust
I love how quick and easy this pretty, no-bake vanilla cheesecake is to make! You can have it ready in no time!
- Start by preheating your oven to 400F. The oven is needed for baking the crust. While not absolutely necessary, baking the crust will make it firmer.
- Place the chocolate cookies into a food processor and pulse until fine crumbs form. Pour in the melted butter and pulse again for about 30 seconds, until the crumbs are well coated.
- Spray the sides and bottom of a 9-inch spring form pan with a baking spray. Transfer the cookie crumbs into the pan, then press into the bottom to form an even and firm crust.
- Bake the crust at 400F for 10 minutes. Remove the pan from the oven and onto a wire rack to cool.

How to Make a No-Bake Vanilla Cheesecake
While the crust is baking and cooling, you can get started on the cheesecake batter.
- Place the softened cream cheese into a mixer bowl. Using a flat beater attachment, beat the cream cheese for 7 to 10 minutes, until the cheese is creamy and smooth. Stop and scrape down the sides of the bowl periodically so all the cheese is well mixed.
- Next, add in the sweetened condensed milk, sour cream, and vanilla extract. Mix again for 2 to 3 minutes, until a smooth mixture forms. Don’t forget to scrape down the sides of the mixing bowl!
- Switch the flat beater attachment to a whisk and pour in the heavy cream. Whisk the cheesecake batter for a few minutes, until smooth and creamy.
- Next, prepare the gelatin. Combine 2 tablespoons water with the gelatin in a measuring cup or bowl. Microwave for about 30 seconds, until the gelatin is completely melted.
- With the mixer running on medium speed, slowly pour in the hot, melted gelatin into the cheesecake batter, avoiding the mixer attachment. Mix for 1 more minute after adding all the gelatin.
- Pour the cheesecake batter over the prepared chocolate crust. Tap the pan hard against your work surface to release any air bubbles, then let the cheesecake stand at room temperature.

Making the Raspberry Sauce
The pretty raspberry hearts on top of the cheesecake are made with a simple raspberry sauce. You can also use strawberries for the sauce, but make sure to cook the jam a little longer to ensure it’s not too runny.
- Combine the raspberries and sugar in a medium-sized saucepan. Mix together and then bring the mixture to a simmer over medium heat.
- Simmer the jam for about 8 to 10 minutes, until the berries have completely fallen apart and the jam has thickened.
- Pour the jam into a fine mesh strainer/sifter arranged over a mixing bowl. Using the back of a spoon or spatula, press the berry juices through the strainer, leaving the seeds behind.
- Allow the resulting sauce to chill in the freezer for about 15 minutes prior to using.
How to Make Raspberry Swirl Cheesecake
To make the swirls on the top, first transfer the raspberry sauce into a sauce dispenser bottle, a disposable pastry bag, or a zip lock bag. If using a bag, cut away a very small amount of the tip off the end.
Drop small little dots onto the cheesecake going around in concentric circles, starting from the outside. Watch my video tutorial to see how it’s done. Next, use a toothpick and pull it gently through the dots of raspberry sauce, creating a heart shape.
Alternate which direction you pull the sauce in, creating swirls in the cheesecake.

Setting & Storing Instructions
Once the cheesecake is garnished, it’s time to let it set. Allow the cheesecake to chill for at least 8 hours or overnight, until it’s completely set.
The cake will store for 3 to 4 days in the refrigerator; just keep it covered and in the springform pan.
Serving Suggestions
When you’re ready to enjoy this no-bake vanilla cheesecake, remove it from the refrigerator. Run a knife or flat spatula around the edges of the pan to release the cake, then gently release and lift the springform ring.
Slide a flat spatula underneath the cheesecake to loosen the bottom from the pan. Gently slide the cheesecake onto a cake stand. Keep the cake refrigerated when not serving.
Serve each slice with any remaining raspberry sauce, if desired. I also like to have some whipped cream on the side!

More Recipes to Try!
Enjoyed this easy and delicious no-bake vanilla cheesecake? Check out some of my other recipes you’re sure to enjoy!
- Classic Vanilla Cheesecake – simple and delicious vanilla cheesecake with berries and whipped cream!
- No-Bake Cranberry Orange Cheesecake – an easy, festive holiday cheesecake with tart berries and aromatic orange!
- White Chocolate Raspberry Cheesecake: one of my favorites! Rich and creamy chocolate cheesecake dotted with raspberries, covered in raspberry sauce, and served with whipped cream!
- No-Bake Maple Strawberry Rhubarb Cheesecake: a cake sweetened entirely with pure maple syrup! A rich, creamy, and fruity cake made with rhubarb jam!
- No-Bake Lemon Cheesecake – rich, creamy, and lemony cheesecake with homemade lemon curd and whipped cream!
Share it on Pinterest!

No-Bake Vanilla Cheesecake with Raspberry Swirls (video)
Ingredients
For Cookie Crust:
- 22 chocolate sandwich cookies, about 1 1/2 cups of cookie crumbs
- 1/4 cup butter, melted
For Cheesecake:
- 24 oz cream cheese, softened at room temp; 3, 8-oz packages
- 14 oz can sweetened condensed milk
- 1 cup sour cream
- 2 tsp vanilla extract
- 1 cup heavy cream
- 1 tbsp unflavored gelatin
- 2 tbsp water
For Raspberry Swirls:
- 2 cups raspberries, fresh or frozen
- 1/2 cup sugar
Instructions
Preparing the Chocolate Crust:
- Start by preheating your oven to 400F. The oven is needed for baking the crust. While not absolutely necessary, baking the crust will make it firmer.
- Place the chocolate cookies into a food processor and pulse until fine crumbs form. Pour in the melted butter and pulse again for about 30 seconds, until the crumbs are well coated.
- Spray the sides and bottom of a 9-inch springform pan with a baking spray. Transfer the cookie crumbs into the pan, then press into the bottom to form an even and firm crust.
- Bake the crust at 400F for 10 minutes. Remove the pan from the oven and onto a wire rack to cool.
Making the Cheesecake Batter:
- Place the softened cream cheese into a mixer bowl. Using a flat beater attachment, beat the cream cheese for 7 to 10 minutes, until the cheese is creamy and smooth. Stop and scrape down the sides of the bowl periodically so all the cheese is well mixed.
- Next, add in the sweetened condensed milk, sour cream, and vanilla extract. Mix again for 2 to 3 minutes, until a smooth mixture forms. Don’t forget to scrape down the sides of the mixing bowl!
- Switch the flat beater attachment to a whisk and pour in the heavy cream. Whisk the cheesecake batter for a few minutes, until smooth and creamy.
- Next, prepare the gelatin. Combine 2 tablespoons water with the gelatin in a measuring cup or bowl. Microwave for about 30 seconds, until the gelatin is completely melted.
- With the mixer running on medium speed, slowly pour in the hot, melted gelatin into the cheesecake batter, avoiding the mixer attachment. Mix for 1 more minute after adding all the gelatin.
- Pour the cheesecake batter over the prepared chocolate crust. Tap the pan hard against your work surface to release any air bubbles, then let the cheesecake stand at room temperature.
Making Raspberry Sauce:
- Combine the raspberries and sugar in a medium-sized saucepan. Mix together and then bring the mixture to a simmer over medium heat.
- Simmer the jam for about 8 to 10 minutes, until the berries have completely fallen apart and the jam has thickened.
- Pour the jam into a fine mesh strainer/sifter arranged over a mixing bowl. Using the back of a spoon or spatula, press the berry juices through the strainer, leaving the seeds behind.
- Allow the resulting sauce to chill in the freezer for about 15 minutes prior to using.
Creating Raspberry Swirls:
- To make the swirls on the top, first transfer the raspberry sauce into a sauce dispenser bottle, a disposable pastry bag, or a zip lock bag. If using a bag, cut away a very small amount of the tip off the end.
- Drop small little dots onto the cheesecake going around in concentric circles, starting from the outside. Watch my video tutorial to see how it’s done. Next, use a toothpick and pull it gently through the dots of raspberry sauce, creating a heart shape.
- Alternate which direction you pull the sauce in, creating swirls in the cheesecake.
Setting, Storing, & Serving Instructions:
- Once the cheesecake is garnished, it’s time to let it set. Allow the cheesecake to chill for at least 8 hours or overnight, until it’s completely set. The cake will store for 3 to 4 days in the refrigerator; just keep it covered and in the springform pan.
- When you’re ready to enjoy this no-bake vanilla cheesecake, remove it from the refrigerator. Run a knife or flat spatula around the edges of the pan to release the cake, then gently release and lift the springform ring.
- Slide a flat spatula underneath the cheesecake to loosen the bottom from the pan. Gently slide the cheesecake onto a cake stand. Keep the cake refrigerated when not serving.
- Serve each slice with any remaining raspberry sauce, if desired. I also like to have some whipped cream on the side!


